How to Trade Break and Retest Without Getting Faked Out
Mastering the Break and Retest: How to Stop Getting Faked Out
We’ve all been there. You spot a perfect resistance line, the price finally punches through with a massive green candle, and you jump in, only for the market to pull a “U-turn” two minutes later, hitting your stop loss before continuing in the original direction.
It’s frustrating, but it’s also the most common mistake in price action trading. The Break and Retest is one of the most powerful setups in a trader’s arsenal, but if you don’t know how to filter the noise, you’re just liquidity for the big banks.
Here is how you trade it like a pro and keep those “fakeouts” to a minimum.
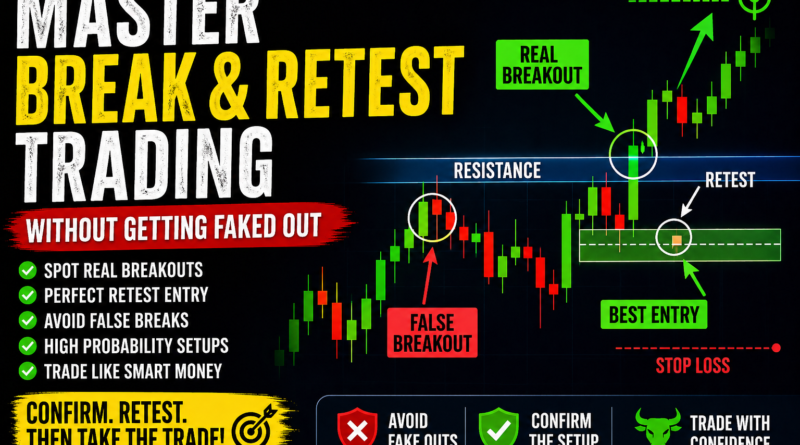
1. The Anatomy of a High-Probability Setup
A true break and retest isn’t just about the price crossing a line. It’s a three-step story:
- The Break: Price breaks through a significant level of support or resistance.
- The Retest: Price returns to that same level (which should now act as the opposite).
- The Rejection: Price shows signs of “respecting” the level before moving away.
2. The Secret Sauce: Wait for the “Rejection Candle”
The biggest mistake traders make is setting a limit order exactly on the line. Don’t do that.
Instead, wait for the price to touch the level and show you it wants to bounce. Look for:
- Pin Bars / Hammer Candles: Showing a long wick pushing away from the level.
- Engulfing Patterns: A strong candle that swallows the previous one.
- Decreasing Volume on the Retest: You want to see the “pullback” happening on low volume, showing that the sellers (in a breakout up) are losing steam.
3. Check the “Higher Time Frame” Context
If you are trading a breakout on the 15-minute chart, but the 4-hour chart is hitting a massive resistance zone, your breakout is likely a trap.
Pro Tip: Always ensure the breakout aligns with the overall trend of the higher time frame. If the daily trend is “Up,” only look for bullish break-and-retest setups.
4. Use the “Buffer Zone” Instead of a Line
Support and resistance are rarely a single price point; they are zones. If you draw your lines too thin, a small dip past the line will scare you out of a winning trade.
Give the market room to breathe. Use a small “zone” of 5–10 pips (depending on the asset) to account for market volatility.
5. The “Change of Character” (ChoCh) Trick
If you want to be extra safe, wait for a Lower Time Frame (LTF) shift during the retest.
If price returns to your retest zone on the 1-hour chart, drop down to the 5-minute chart. Wait for the 5-minute chart to make a “Higher High” and a “Higher Low.” This confirms that the buyers have officially stepped back in and the momentum has shifted back in your favor.
Summary Checklist
- [ ] Did the break happen with strong volume?
- [ ] Is the retest “lazy” (low volume/slow move)?
- [ ] Did a rejection candle form at the zone?
- [ ] Does this align with the higher time frame trend?
Trading isn’t about catching every move; it’s about catching the right moves. By waiting for confirmation instead of chasing the initial spike, you’ll significantly increase your win rate and keep your account balance out of the “fakeout” trap.